


What you'll need:
Instructions:
What's happening?
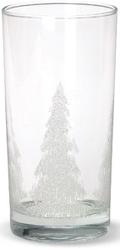
Each of the glasses will have a different tone when hit with the pencil, the glass with the most water will have the lowest tone while the glass with the least water will have the highest. Small vibrations are made when you hit the glass, this creates sound waves which travel through the water. More water means slower vibrations and a deeper tone.
|

Follow


Dashboard


Saturday, 10 December 2011
 Making Music with Water
Have you ever tried making music with glasses or bottles filled with water? I bet you favourite band hasn't. Experiment with your own special sounds by turning glasses of water into instruments, make some cool music and find out how it works.
Saturday, 3 December 2011
Make a Crystal Snowflake!
What you'll need:
- String
- Wide mouth jar
- White pipe cleaners
- Blue food coloring (optional)
- Boiling water (take care or better still get an adult to help)
- Borax
- Small wooden rod or pencil
Instructions:
- Grab a white pipe cleaner and cut it into three sections of the same size. Twist these sections together in the center so that you now have a shape that looks something like a six-sided star. Make sure the points of your shape are even by trimming them to the same length.
- Take the top of one of the pipe cleaners and attach another piece of string to it. Tie the opposite end to your small wooden rod or pencil. You will use this to hang your completed snowflake.
- Carefully fill the jar with boiling water (you might want to get an adult to help with this part).
- For each cup of water add three tablespoons of borax, adding one tablespoon at a time. Stir until the mixture is dissolved but don’t worry if some of the borax settles at the base of the jar.
- Add some of the optional blue food coloring if you'd like to give your snowflake a nice bluish tinge.
- Put the pipe cleaner snowflake into the jar so that the small wooden rod or pencil is resting on the edge of the jar and the snowflake is sitting freely in the borax solution.
- Leave the snowflake overnight and when you return in the morning you will find the snowflake covered in crystals! It makes a great decoration that you can show your friends or hang somewhere in your house.
What's happening?
Crystals are made up of molecules arranged in a repeating pattern that extends in all three dimensions. Borax is also known as sodium borate, it is usually found in the form of a white powder made up of colorless crystals that are easily dissolved in water.
When you add the borax to the boiling water you can dissolve more than you could if you were adding it to cold water, this is because warmer water molecules move around faster and are more spread apart, allowing more room for the borax crystals to dissolve.
When the solution cools, the water molecules move closer together and it can't hold as much of the borax solution. Crystals begin to form on top of each other and before you know it you have your completed crystal snow flake!
Make Your Own Rainbow
What you'll need:
- A glass of water (about three quarters full)
- White paper
- A sunny day
Instructions:
- Take the glass of water and paper to a part of the room with sunlight (near a window is good).
- Hold the glass of water (being careful not to spill it) above the paper and watch as sunlight passes through the glass of water, refracts (bends) and forms a rainbow of colors on your sheet of paper.
- Try holding the glass of water at different heights and angles to see if it has a different effect.
What's happening?
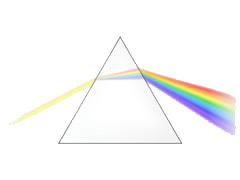
While you normally see a rainbow as an arc of color in the sky, they can also form in other situations. You may have seen a rainbow in a water fountain or in the mist of a waterfall and you can even make your own such as you did in this experiment.
Rainbows form in the sky when sunlight refracts (bends) as it passes through raindrops, it acts in the same way when it passes through your glass of water. The sunlight refracts, separating it into the colors red, orange, yellow, green, blue, indigo and violet.
Thursday, 1 December 2011
Bending Water with Static
What you'll need:
- A plastic comb (or an inflated balloon)
- A narrow stream of water from a tap
- Dry hair
Instructions:
- Turn on the water so it is falling from the tap in a narrow stream (just a few millimetres across but not droplets).
- Run the comb through your hair just as you normally would when brushing it (do this around 10 times). If you are using a balloon then rub it back and forth against your hair for a few seconds.
- Slowly move the comb or balloon towards the stream of water (without touching it) while watching closely to see what happens.
What's happening?
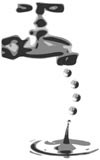
The static electricity you built up by combing your hair or rubbing it against the balloon attracts the stream of water, bending it towards the comb or balloon like magic!
Negatively charged particles called electrons jump from your hair to the comb as they rub together, the comb now has extra electrons and is negatively charged. The water features both positive and negatively charged particles and is neutral. Positive and negative charges are attracted to each other so when you move the negatively charged comb (or balloon) towards the stream, it attracts the water's positively charged particles and the stream bends!
Monday, 21 November 2011
Make Your Own Weather Vane
What you'll need:
- An icecream container lid (or an old food container lid)
- Scissors or a craft knife (be careful and use adult help when necessary)
- A marker (felt pen)
- A skewer
- A straw
- A pin
Instructions:
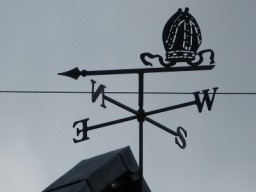
- Trace a triangle onto the icecream container lid with the marker and cut it out. Repeat the process but this time trace and cut out a rectangle.
- Cut a slit in both ends of the straw and slide the triangle in one end and the rectangle in the other end and glue into place.
- Push a pin through the exact middle of the straw and then into the flat end of the skewer.
- Place it outside where you can easily see it from the inside and you’ll be able to tell which direction the wind is blowing without even having to go outside.
What's next?
Combine your wind direction results with wind speed, air pressure and rain fall for a full weather report.
Tuesday, 15 November 2011
Rapid Color Changing Chemistry!
Sometimes it’s hard to tell SCIENCE from MAGIC
- and this little demonstration is a great example of that. In this
experiment you will watch an almost clear liquid suddenly turn dark blue
in a flash. It takes a bit of preparation, and probably a trip to the
pharmacy for materials, but we think it’s worth it.
 IMPORTANT SAFETY INFORMATION: This
experiment should only be done with the help of an adult. Iodine will
stain just about anything it touches and it can be hazardous. Hydrogen
peroxide can cause eye and skin irritation - safety goggles are needed
throughout the experiment. Be sure your helpful adult reads the caution
labels on each container.
IMPORTANT SAFETY INFORMATION: This
experiment should only be done with the help of an adult. Iodine will
stain just about anything it touches and it can be hazardous. Hydrogen
peroxide can cause eye and skin irritation - safety goggles are needed
throughout the experiment. Be sure your helpful adult reads the caution
labels on each container.


This is an example of the chemical reaction know as the IODINECLOCK REACTION. It is called a clock reaction because you can change the amount if time it takes for the liquids to turn blue. (see experiments below) The chemistry of the demonstration gets a bit complicated, but basically it is a battle of chemistry between the starch which is trying to turn the iodine blue, and the Vitamin C which is keeping it from turning blue. Eventually the Vitamin C loses and, bam! - you get instant blueness.
Note: If you do not have liquid starch, you can also use 1/2 teaspoon of corn starch or potato starch. The liquids will be more cloudy and the reaction will happen a bit more slowly, but it’s still impressive.
Clean up: Carefully pour all liquids down the drain with plenty of water and wash your hands. Recycle the cups or dispose of them in the trash.

The project above is a DEMONSTRATION. To make it a true experiment, you can try to answer these questions:
- 3 clear plastic cups 4 ounces or larger
- A 1000 mg Vitamin C tablet from the pharmacy (you can also use two 500mg)
- Tincture of iodine (2%) also from the pharmacy
- Hydrogen peroxide (3%) yep, also from the pharmacy
- Liquid laundry starch (see below for alternatives)
- Safety goggles
- Measuring spoons
- Measuring cup
- An adult helper
- Put on those safety goggles and mash the 1000 mg Vitamin C
tablet by placing it into a plastic bag and crushing it with a rolling
pin or the back of a large spoon. Get it into as much of a fine powder
as possible. Then put all the powder in the first cup and add 2 ounces
(60 ml) of warm water. Stir for at least 30 seconds. (The water may be a
little cloudy) Let’s call this “LIQUID A”
- Now put 1 teaspoon (5 ml) of your LIQUID A into a new cup
and add to it: 2 oz (60 ml) of warm water and 1 teaspoon (5 ml) of the
iodine. Notice the brown iodine turned clear! Let’s call this “LIQUID
B.” By the way, you’re done with LIQUID A - you can put it aside.
- In the last cup, mix 2 oz of warm water, 1 Tablespoon (15
ml) of the hydrogen peroxide and 1/2 teaspoon (2.5 ml) of the liquid
starch. This is, you guessed it, “LIQUID C”
- Okay, that was a lot of preparation, on to the fun part. Gather the friends and family and pour all of LIQUID B into LIQUID C. Then pour them back and fourth between the 2 cups a few times. Place the cup down and observe….be patient....somewhere between a few seconds and a few minutes, the liquid will suddenly turn dark blue!
This is an example of the chemical reaction know as the IODINECLOCK REACTION. It is called a clock reaction because you can change the amount if time it takes for the liquids to turn blue. (see experiments below) The chemistry of the demonstration gets a bit complicated, but basically it is a battle of chemistry between the starch which is trying to turn the iodine blue, and the Vitamin C which is keeping it from turning blue. Eventually the Vitamin C loses and, bam! - you get instant blueness.
Note: If you do not have liquid starch, you can also use 1/2 teaspoon of corn starch or potato starch. The liquids will be more cloudy and the reaction will happen a bit more slowly, but it’s still impressive.
Clean up: Carefully pour all liquids down the drain with plenty of water and wash your hands. Recycle the cups or dispose of them in the trash.
The project above is a DEMONSTRATION. To make it a true experiment, you can try to answer these questions:
1. Does the temperature of the water affect how quickly the liquids turn blue?
2. Does the amount of Vitamin C added (Liquid A) affect how fast the liquid turns blue?
3. Does stirring the liquids more affect how fast the liquids turn blue?
Sunday, 13 November 2011
Make Your Own Kaleidoscope
 What you'll need:
- 3 pieces of mirrored perspex
- A roll of duct tape or masking tape
- Overhead transparency paper
- Colored see-through plastic
- A pencil
Instructions:
- Take 3 pieces of mirrored perspex and tape them together to form a triangle shape. Make sure it is solid and the tape is on the outside of the triangle.
- Trace around the small triangle at the end of the kaleidoscope onto the overhead transparency paper (add another 1cm all the way around the triangle to allow for folding).
- Place the transparency paper onto the end of the kaleidoscope and cut slits at the corners so the edges can be folded down.
- Tape the transparency paper into place.
- Draw another triangle, making this 2cm bigger than the last.
- Decide what kind of colored see-through plastic you would like to put inside your kaleidoscope. Cut out small pieces that will sit on top of the transparency paper.
- Put the colored plastic over the end of the kaleidoscope that has the transparency paper, and on top of that add the other (slightly bigger) triangle transparency paper. Tape the second triangle down on top so that there is still just enough room for the plastic to move between the two transparencies.
- When your kaleidoscope is finished feel free to design and decorate a cover using cardboard, felt pens, glitter, tubing or anything else you want to use.
What's
happening?
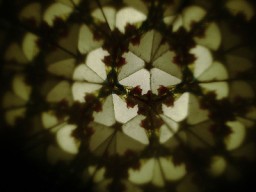
The patterns inside your
kaleidoscope are made by light bouncing between the mirrors on the
inside. While you look through one end, light enters through the other
and reflects off the mirrors. Varying colors and patterns are formed
thanks to the symmetric pattern created by the well placed mirrors.
